| 일 | 월 | 화 | 수 | 목 | 금 | 토 |
|---|---|---|---|---|---|---|
| 1 | 2 | 3 | 4 | 5 | 6 | 7 |
| 8 | 9 | 10 | 11 | 12 | 13 | 14 |
| 15 | 16 | 17 | 18 | 19 | 20 | 21 |
| 22 | 23 | 24 | 25 | 26 | 27 | 28 |
- nestJS
- OpenCV
- spring boot
- 컴포넌트스캔
- 파이썬
- C언어
- Spring
- 가상면접사례로배우는대규모시스템설계기초
- @Component
- 프로그래머스
- nestjs auth
- 시스템호출
- 카카오 알고리즘
- @Autowired
- 코테
- 카카오 코테
- TypeORM
- python
- AWS
- C++
- nestjs typeorm
- 해시
- 카카오
- 알고리즘
- 스프링
- 구조체배열
- 코딩테스트
- Nodejs
- git
- thymeleaf
- Today
- Total
공부 기록장 💻
[Spring] View 환경 설정 (Thymeleaf 템플릿 엔진 동작 방식, Controller 작성, 내장 Tomcat local Server 로드) 본문
[Spring] View 환경 설정 (Thymeleaf 템플릿 엔진 동작 방식, Controller 작성, 내장 Tomcat local Server 로드)
dream_for 2023. 1. 4. 15:43인프런 "스프링 입문 - 코드로 배우는 스프링 부트, 웹 MVC, DB 접근 기술" 정리
Spring Boot의 Welcome Page 정적 페이지 로드 기능
Spring Boot에서 Servlet Web applications 에서는 Static Content를 이용해 Welcome Page 정적 페이지를 띄우는 기능을 제공하고 있다.
다음의 공식 문서에서 자세하게 설명하고 있다.
https://docs.spring.io/spring-boot/docs/current/reference/html/web.html#web
Web
Graceful shutdown is supported with all four embedded web servers (Jetty, Reactor Netty, Tomcat, and Undertow) and with both reactive and servlet-based web applications. It occurs as part of closing the application context and is performed in the earliest
docs.spring.io
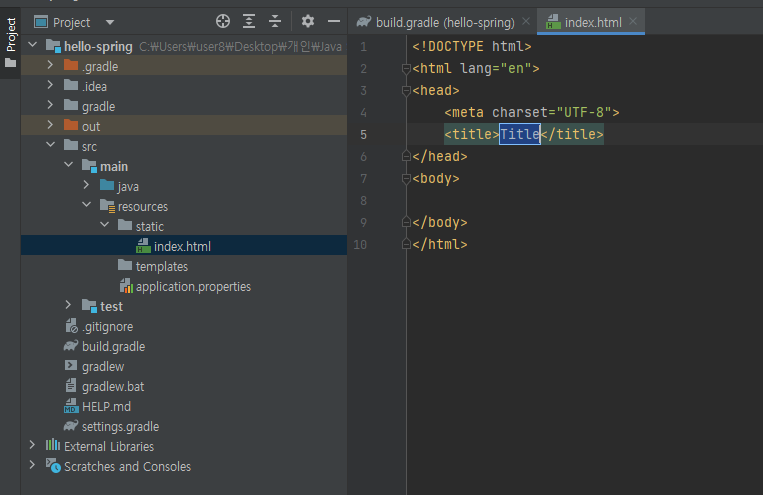
src > main > resources > static 폴더에 index.html을 추가해보도록 하자.
정적 파일들을 저장하는 디렉터리로, index.html은 내장 톰캣 웹 서버를 통해 예시로 띄워볼 View 화면의 html 페이지이다.

index.html을 아래와 같이 title, meta 태그와 body 부분을 조금 수정해보았다.

HelloSpringApplication을 실행하고, localhost:8080 경로로 웹 서버를 띄워보면 다음과 같이 index.html 이 로드된 것을 확인할 수 있다.

Thymeleaf 템플릿 엔진
웹 애플리케이션 제작에 있어 사용하게 될 웹 View 템플릿 엔진 라이브러리는 Thymeleaf로 공식 문서 사이트는 다음과 같다.
Thymeleaf
Integrations galore Eclipse, IntelliJ IDEA, Spring, Play, even the up-and-coming Model-View-Controller API for Java EE 8. Write Thymeleaf in your favourite tools, using your favourite web-development framework. Check out our Ecosystem to see more integrati
www.thymeleaf.org
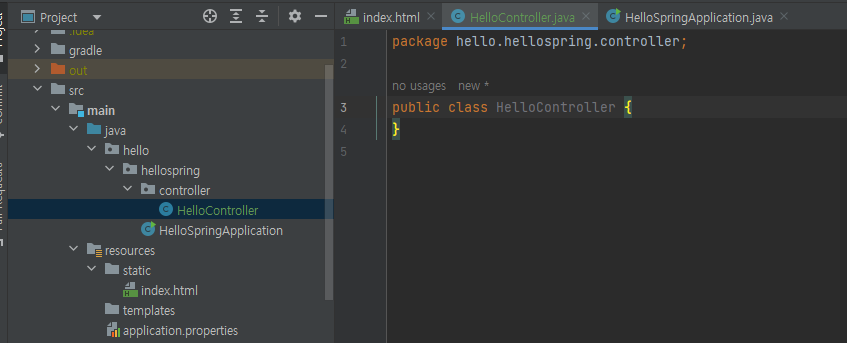
hello.hellospring 디렉터리 밑에 controller 라는 이름의 패키지를 만들고, 내부에 HelloController 클래스를 생성해보자.

아래와 같이 @Controller 어노테이션을 작성하고, 클래스 내부에
@GetMapping("hello") 그리고 hello 라는 함수 내에 인자로는 스프링 ui 라이브러리의 Model 객체 model을 적어주고,
model의 addAttribuite() 메서드 내에 두 인자 "data" 와 "hello!!" 를 적어주자.
이는 data 라는 key 값의 value를 hello!! 로 정한다는 의미이다.

그리고 templates 디렉터리 내에 hello.html을 아래와 같이 작성해주자.

<html xmlns:th="http://www.thymeleaf.org"> 를 작성하여 타임리프 템플릿 엔진의 문법을 사용할 수 있도록 메타 설정을 해주고,
<p> 태그 내부에 th 문법을 통해 <p th:text="'안녕하세요.' + ${data}"> 안녕하세요. 손님 을 작성해주면
아래와 같이 로컬 서버의 hello 경로에, data가 "hello!!" 로 치환되어 나타나는 것을 확인할 수 있다.

위에서 Model 클래스의 addAttribute() 메서드를 통해 data의 key 값에 hello!! 값을 넣어주었으므로,
${data} 부분에서 data가 해당 value 로 치환되어 나타난 것을 확인할 수 있다.
Tyhymeleaf 템플릿 엔진의 동작 방식
Spring Boot에는 내장 Tomcat Server이 존재한다.
로컬 서버의 경로 localhost:8080/hello 로 브라우저가 진입을 하게 되면,
helloController에서 작성한 것을 바탕으로, url 매칭을 진행한 후,
HTTP GET 메서드를 통해 hello() 메서드를 실행하게 된다.

hello() 메서드의 리턴 값인 "hello" 를 통해 viewResolver가 resources > templates 아래에 작성된 "hello" 라는 이름의 html 파일을 탐색하여 렌더링 명령을 내려 화면을 띄우게 된다.
viewResolver는 spring boot 템플릿 엔진 기본인 viewName을 매핑하는데, 'resouces:templates/' + {viewName}+'.html' 파일을 탐색하는 것이라 할 수 있다. (viewName이 hello 로 치환됨)
그리고 model의 addAttribute() 메서드로 key와 value 값을 각각 인자로 작성한 바가 있기 때문에, thymeleaf 템플릿 변수들은 model(data:hello!) 을 통해 키-값 매칭을 진행하여 최종적인 화면을 띄우게 된다. (${data} 의 data가 hello!! 로 치환됨)
즉 이것을 아래를 통해 구체적으로 살펴보면 다음과 같다.
1. "localhost:8080/hello" 경로로 이동하게 되면,
2. @GetMapping() 어노테이션의 인자로 "hello" 를 가진 것을 찾는다.
3. 해당 어노테이션에 작성된 메서드를 실행하고, 리턴 값의 "hello" 에 해당하는 "hello.html" 페이지를 띄우게 된다.
4. html 페이지 내 템플릿 변수 data는, model에 등록한 attribute의 data 키에 해당하는 "hello!!" 값으로 치환하게 된다.
위의 과정으로, 템플릿 변수에 맞는 값을 치환하여 최종적인 hello.html 페이지를 화면 View를 통해 띄우게 되는 것이다.

'# Tech Studies > Java Spring • Boot' 카테고리의 다른 글
| [Spring] Spring Boot의 정적 컨텐츠 기능 (0) | 2023.01.05 |
|---|---|
| [Spring] Gradle 빌드와 실행 (컴파일, 링크, 빌드의 차이점과 Gradle build 설정) (1) | 2023.01.04 |
| [Spring] Spring Boot Gradle의 라이브러리와 의존성 (0) | 2023.01.04 |
| [Spring] 프로젝트 환경 설정 & Spring Boot 3.0 이후 Java SDK 버전 차이로 생기는 에러 해결 (0) | 2023.01.04 |
| 스프링 입문 - 코드로 배우는 스프링 부트, 웹 MVC, DB 접근 기술 강의 수강 시작(인프런) (0) | 2023.01.04 |


