| 일 | 월 | 화 | 수 | 목 | 금 | 토 |
|---|---|---|---|---|---|---|
| 1 | 2 | 3 | 4 | 5 | 6 | 7 |
| 8 | 9 | 10 | 11 | 12 | 13 | 14 |
| 15 | 16 | 17 | 18 | 19 | 20 | 21 |
| 22 | 23 | 24 | 25 | 26 | 27 | 28 |
- 알고리즘
- C언어
- 해시
- C++
- 컴포넌트스캔
- spring boot
- 시스템호출
- Nodejs
- 파이썬
- 코딩테스트
- @Component
- TypeORM
- 프로그래머스
- nestJS
- Spring
- nestjs typeorm
- git
- 가상면접사례로배우는대규모시스템설계기초
- AWS
- 구조체배열
- 카카오 코테
- @Autowired
- 코테
- nestjs auth
- python
- 카카오 알고리즘
- OpenCV
- 카카오
- thymeleaf
- 스프링
- Today
- Total
공부 기록장 💻
[NodeJS/NestJS] Nest.js 프로젝트 시작 및 초기 환경 설정, User 인증 Authentication - 회원가입 기능 구현하기 본문
[NodeJS/NestJS] Nest.js 프로젝트 시작 및 초기 환경 설정, User 인증 Authentication - 회원가입 기능 구현하기
dream_for 2022. 8. 25. 00:37NodeJS 프레임워크인 NestJS에서 User Authentication 중 회원가입 기능 구현을 해보도록 하자.
우선 다음과 같이 nest를 위한 typeorm 모듈을 설치하도록 하자.
$ npm i --save @nestjs/typeorm typeormTypeORM에 대한 자세한 설명은
https://dream-and-develop.tistory.com/198
https://www.npmjs.com/package/@nestjs/typeorm
(공식문서)
를 참고하자.
다음으로, auth 모듈, 컨트롤러, 서비스를 생성해준다.
$ nest g module auth
$ nest g controller auth
$ nest g service auth
User Entity
이후, auth 폴더 내에 entity 폴더를 생성하고, user.entity.ts 파일을 생성해준다.
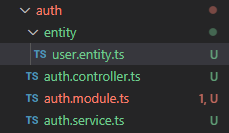
user.entity.ts 파일에 다음과 같이 작성한다.
@Entity() 데코레이터를 이용해 user 개체를 생성해주도록 한다.
User의 필드로는, @PrimaryColumn() 데코레이터로 email을 primary key로 지정하고,
password는 일반 Column() 으로 지정한다.
import { Column, Entity, PrimaryColumn, PrimaryGeneratedColumn } from "typeorm";

@Entity('user')
export class User{
    @PrimaryColumn()
    email: string;

    @Column()
    password: string;
}
User Repository
이번에는 유저 레포지터리를 만들어보자.
auth 폴더 내에 user.repository.ts 파일을 만들어준다.
@EntityRepository() 데코레이터를 이용해 User 객체에 대한 Repository 클래스를 상속받아 UserRepository 클래스를 생성하고 export한다.
import { EntityRepository, Repository } from "typeorm";
import { User } from "./entity/user.entity";

@EntityRepository(User)
export class UserRepository extends Repository<User>{}
그러나,
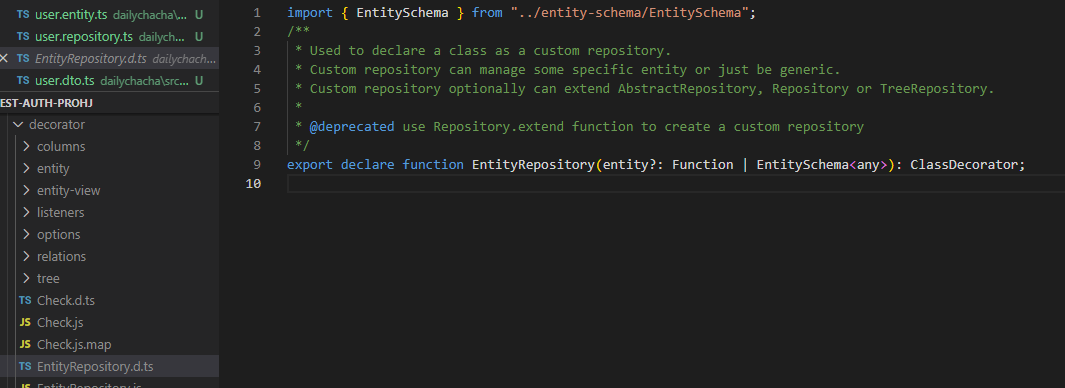
typeorm에서 제공해야 하는 EntityRepository는 아래와 같이 최신 버전에서는 더이상 사용되지 않는 모듈이다.
아래 설명과 같이 현재는 deprecated 된 모듈이며, 커스텀 레포지터리를 만들기 위해서는 Repository.extend 를 사용해야 한다.
이를 해결하기 위한 방법은 아래 적어놓았다. (다행히 stackoverflow에서 Custom Repository를 생성하는 코드가 나와있어 이를 참고하여 문제들을 해결하였다.)

User DTO
이제는 User의 DTO를 만들어보자.
auth 폴더 내에 dto 폴더를 생성하고, user.dto.ts 파일을 생성하자.

export할 UserDTO 클래스를 생성하고, string 타입의 email과 password를 포함시키자.
export class UserDTO{
    email: string;
    password: string;
}
User Service
auth 폴더 내에 user.service.ts 파일을 생성하자.
회원가입을 시도할 때 등록이 되어 있는 유저인지 확인하는 findByFields 함수와 신규 유저를 등록하는 save 함수를 작성하자.
findByFields 함수는 인수로 들어오는 옵션(이메일 또는 username 혹은 ID 등)이 이미 db에 있는 것인지 탐색하고,
탐색 성공 시 해당 개체를 반환하게 된다.
save 함수는 인자로 들어온 UserDTO 개체를 그대로 저장하게 된다.
import { Injectable } from "@nestjs/common";
import { InjectRepository } from "@nestjs/typeorm";
import { FindOneOptions } from "typeorm";
import { UserDTO } from "./dto/user.dto";
import { UserRepository } from "./user.repository";

@Injectable()
export class UserService{
    constructor(
        @InjectRepository(UserRepository)
        private userRepository: UserRepository
        ){}

        // 등록이 된 유저인지 확인
        async findByFields(options: FindOneOptions<UserDTO>): Promise<UserDTO | undefined>{
            return await this.userRepository.findOne(options);
        }

        // 신규 유저 등록
        async save(userDTO: UserDTO): Promise<UserDTO | undefined>{
            return await this.userRepository.save(userDTO);
        }
}
Auth Service
auth.service.ts 에서 생성한 User Service를 사용할 수 있도록 하자.
새로운 유저를 등록하는 registerUser 함수를 작성한다.
이때, userService의 findByFields를 실행하여, 새로 등록하려는 newUser 개체의 email을 인수로 보내 해당 이메일을 가진 데이터가 이미 존재하는지 확인한다.
이미 존재하는 경우, BAD_REQUEST 상태 코드를 보내 오류를 처리하도록 하고,
오류가 없다면, userService의 save 함수를 실행하여 newUser 객체를 저장할 수 있도록 한다.
import { HttpException, HttpStatus, Injectable } from '@nestjs/common';
import { UserDTO } from './dto/user.dto';
import { UserService } from './user.service';

@Injectable()
export class AuthService {
    constructor(
        private userService:UserService
    ){}

    // 새로운 유저 등록
    async registerUser(newUser:UserDTO): Promise<UserDTO>{
        // 이미 등록되어 있는 이메일이 있는지 탐색
        let userFind: UserDTO = await await this.userService.findByFields({
            where: {email: newUser.email}
        });
        // 탐색되었다면, Bad Request 오류 처리 (HTTP상태 코드 400)
        if(userFind){
            throw new HttpException('user already used!', HttpStatus.BAD_REQUEST)
        }
        // 새로운 유저 정보 저장
        return await this.userService.save(newUser);
    }
}
Auth Controller
auth.controller.ts 파일을 작성해보자.
AuthController에 AuthService를 추가하자.
rest api로 사용되는 메소드는 Post 이고, url은 /sign-up 이다.
(로컬에서 서버를 돌릴 때에는, https://localhost:3000/auth/sign-up 에 데이터를 보내야 한다.)
유저를 등록하는 signup 함수를 만든다.
첫번째 인수로는 express 모듈의 Request 요청 데코레이터를,
두번째 인수로는 Body의 데이터로 보낼 UserDTO로 설정한다.
authService의 registerUser 메서드가 실행된다.
import { Body, Controller, Post, Req } from '@nestjs/common';
import { Request } from 'express';
import { AuthService } from './auth.service';
import { UserDTO } from './dto/user.dto';

@Controller('auth')
export class AuthController {
    constructor(private authService: AuthService){}

     // 회원가입
    @Post('/sign-up')
    async signup(
        @Req() req: Request, @Body() UserDTO: UserDTO): Promise<UserDTO>{
            return await this.authService.registerUser(UserDTO);
        }
}
Auth Module 등록
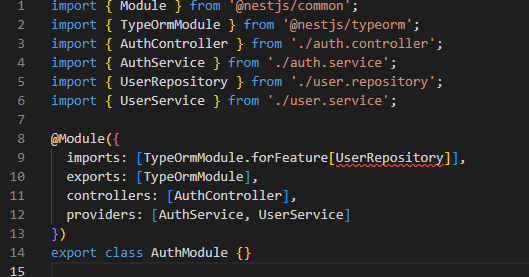
imports 부분에 TypeoOrmModule.forFeater[UserRepository]를 추가해주고,
exports에는 TypeOrmModule을,
그리고 providers에는 UserService를 추가해준다.
import { Module } from '@nestjs/common';
import { TypeOrmModule } from '@nestjs/typeorm';
import { AuthController } from './auth.controller';
import { AuthService } from './auth.service';
import { UserRepository } from './user.repository';
import { UserService } from './user.service';

@Module({
  imports: [TypeOrmModule.forFeature[UserRepository]],
  exports: [TypeOrmModule],
  controllers: [AuthController],
  providers: [AuthService, UserService]
})
export class AuthModule {}
최신 버전의 typeorm에서 Deprecated 된 EntityRepository를 Custom Repository로 변경해보자!
How to workraound this TypeORM error, "EntityRepository is deprecated , use Repository.extend function instead"?
However, I can't find any Repository.extend method in Repository class and there's nothing about it in the documentation. How to solve this? typeorm version: "^0.3.0" I'm using nest js and
stackoverflow.com
이제, typeorm 최신 버전에서 deprecated 된 EntityRepository() 모듈 문제를 어떻게 해결해야 하는가?
위의 stackoverflow에서 가르쳐준 방식 그대로 적용해보았다.
https://kscodebase.tistory.com/524
위의 블로그에서도 문제점의 원인과 해결 방식에 대해 잘 설명하고 있어 참고하였다.
package.json 에서 dependencies를 통해 확인해보면, @nestjs/typeorm의 버전이 현재 9.0.1 이고, typeorm의 버전은 0.3.7임을 확인할 수 있다.

하지만 typeorm은 최신 버전에서 더이상 지원하지 않는, deprecated된 모듈이므로
직접 Custom Repository로 만들어 사용하는 작업이 필요하다.
먼저 src 폴더 내에 db 폴더를 생성하고, 두 파일 ( typeorm-ex.decorator.ts , typeorm-ex.module.ts ) 을 생성해주자.
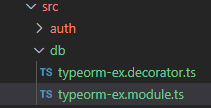
// src/db/typeorm-ex.decorator.ts

import { SetMetadata } from "@nestjs/common";

export const TYPEORM_EX_CUSTOM_REPOSITORY = "TYPEORM_EX_CUSTOM_REPOSITORY";

export function CustomRepository(entity: Function): ClassDecorator {
  return SetMetadata(TYPEORM_EX_CUSTOM_REPOSITORY, entity);
}
// src/db/typeorm-ex.module.ts

import { DynamicModule, Provider } from "@nestjs/common";
import { getDataSourceToken } from "@nestjs/typeorm";
import { DataSource } from "typeorm";
import { TYPEORM_EX_CUSTOM_REPOSITORY } from "./typeorm-ex.module";

export class TypeOrmExModule {
  public static forCustomRepository<T extends new (...args: any[]) => any>(repositories: T[]): DynamicModule {
    const providers: Provider[] = [];

    for (const repository of repositories) {
      const entity = Reflect.getMetadata(TYPEORM_EX_CUSTOM_REPOSITORY, repository);

      if (!entity) {
        continue;
      }

      providers.push({
        inject: [getDataSourceToken()],
        provide: repository,
        useFactory: (dataSource: DataSource): typeof repository => {
          const baseRepository = dataSource.getRepository<any>(entity);
          return new repository(baseRepository.target, baseRepository.manager, baseRepository.queryRunner);
        },
      });
    }

    return {
      exports: providers,
      module: TypeOrmExModule,
      providers,
    };
  }
}
이후, user repository의 데코레이터를 @EntityRepository() 에서 직접 커스텀한 @CustomRepository()로 다음과 같이 변경해준다.
import { CustomRepository } from "src/db/typeorm-ex.module";
import { EntityRepository, Repository } from "typeorm";
import { User } from "./entity/user.entity";

@CustomRepository(User)
export class UserRepository extends Repository<User>{}
그리고, Auth Module의 imports 내용을 다음과 같이 변경해준다.
@Module({
  imports: [TypeOrmExModule.forCustomRepository([UserRepository])],
  exports: [TypeOrmModule],
  controllers: [AuthController],
  providers: [AuthService, UserService]
})
export class AuthModule {}
만약, 이러한 과정을 거치고 싶지 않고, 이전의 EntityRepository를 그대로 사용하고 싶다면
typeorm의 버전을 다음과 같이 변경하도록 하자.
npm i @nestjs/typeorm@^현재버전 typeorm@^0.2.45
MySQL DB - TYPEORM 지정
이제 다시 돌아와,
typeorm을 위한 mysql db server을 준비해보자.
SQL 쿼리문으로 다음과 같이 test schema를 생성해준다.
간혹, test db가 이미 생성되어 있다는 오류가 뜨기도 하므로 test db를 drop 하는 명령어를 미리 실행시킨다.
drop database test;
create schema test default character set utf8mb4 collate utf8mb4_unicode_ci;

이전에,
mysql db와 연결될 수 있도록 app.module.ts 에 다음과 같이 typeorm 설정 부분을 추가하도록 하자.
port 번호는 어떠한 데이터베이스를 사용할 것이냐에 따라 달라지므로, 이 점에 유의하자. (mysql, postgres 등)
import { Module } from '@nestjs/common';
import { TypeOrmModule } from '@nestjs/typeorm';
import { AppController } from './app.controller';
import { AppService } from './app.service';
import { AuthModule } from './auth/auth.module';
import { User } from './auth/entity/user.entity';
import { UserRepository } from './auth/user.repository';
import { TypeOrmExModule } from './db/typeorm-ex.decorator';

@Module({
  imports: [
    TypeOrmModule.forRoot({
      type: 'mysql',
      host: 'localhost',
      port: 3306,
      username: 'root',
      password: '0000',
      database: 'test',
      entities: [__dirname + '/**/*.entity{.ts,.js}'],
      synchronize: true,
    }),
    TypeOrmExModule.forCustomRepository([UserRepository]),
    AuthModule,
  ],
  controllers: [AppController],
  providers: [AppService],
})
export class AppModule {}
Postman 을 통한 API 검증, MySQL DB 연결 확인
설정이 완료되었으면, POSTMAN에서 다음과 같이 로컬에서 api 실행을 통해 검증해보는 과정을 거치도록 하자.
localhost:3000/auth/sign-up 에 POST 요청을 보내자.
BODY 부분에는 json 형식의 raw 데이터를 아래와 같이 email, password에 임의의 데이터를 입력하여 send해보도록 하자.
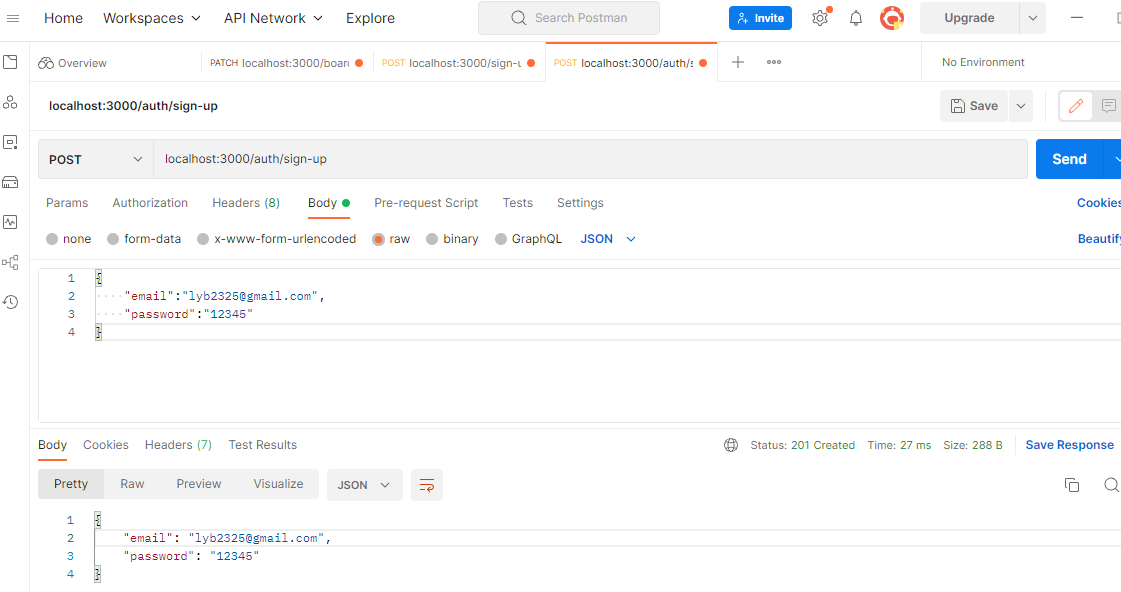
Http Status는 201 Created로, 새로운 POST Request가 잘 전달되어 User 개체가 생성된 응답이 나타난 것을 확인할 수 있다.
이번엔 3306 port에 연결되어 있는 mysql 에서 db에 데이터가 제대로 생성이 되어 있는지 확인해보자.
select * from test.user;
test 데이터베이스의 user 테이블을 확인해보니, email과 password 필드와 함께 post 요청 보낸 데이터가 나타나 있음을 확인할 수 있다.

이번엔 더 많은 유저 데이터를 저장하고 확인해보자.
아래와 같이 결과가 잘 나타남을 확인하였다.

Postman에서 이번에는 동일한 email을 가진 유저를 회원가입 하는 request를 보내보자.
위에서 이미 저장한 유저 중 동일한 이메일을 가진 데이터를 post하도록 요청을 보내보았더니,
HTTP 400 status code와 함께 오류 처리할 때 나타다도록 지정한 메시지 "user already used!" 가 나타남을 확인할 수 있다.

이로써, 간단하고도 많은 트러블이 발생하였던 NestJS 상에서의 인증 기능 중 "회원가입" 기능을 구현 완료하였다.
[참고자료]
https://youtu.be/4mjd5P7cZIA?list=PLeNJ9AVv90q1kEX-bz1r_56imtp5_aJ6q
https://kscodebase.tistory.com/524
'# Tech Studies > NestJS' 카테고리의 다른 글
| [NestJS/TypeORM] DataSource, Database Connection for TypORM (0) | 2022.10.26 |
|---|---|
| [NodeJS/NestJS] User Authentication - JWT 토큰 인증 (0) | 2022.08.25 |
| [NodeJS/NestJS] User 인증 Authentication - 로그인 기능 구현하기 / 비밀번호 암호화(password bycrpyt) (0) | 2022.08.25 |
| [NodeJS/TypeORM] ORM, TypeORM 이란? (0) | 2022.08.25 |
| [Node/NestJS] (0) | 2022.08.23 |


